Thrift Shop Goodness

It is no secret that I love me some thrift shops, and not just for the money-saving it offers. I love to wander and look at all of the different items. So much variety! I wonder where things have been, where the will go, what they would say if they could talk. Yes, I often think a little too deep and too much, it’s a talent and a burden. With that said, I thought I would share thoughts on items I found on a recent trip to one of our local thrift stores. (Snowline Hospice) It is a great place, lots of variety within the numerous stores they have, and they support a great service in our area.

I rarely ever go into a thrift store with a specific item in mind, I found that I am very disappointed when I do that. I visit thrift stores to wander, that does not mean that I do not have certain items I am looking for. I keep a list on my cell phone and I refresh my head with that list before each visit. Currently I am on the look out for a corded telephone, strawberry fabric, any kind of old cool looking camera and shorts for the kiddo. I will add things depending on the art projects I am doing, remove items if I am tired of looking for or not needing any longer. Some stores will even let you leave your name and telephone number and the particular item you are looking for.

This particular trip to the thrift was just to wander. I did not have much money so I was not really in the market for much but I have a soft spot for stuffed monkeys and ended up with these guys, they have been fondly named Elvis and Priscilla. I could not say no.
SL 2
I used to collect shot glasses, then I grew up, so cute stuffed monkeys it is!

I always have my eyes peeled for old school and unique kitchen items for a girl friend. I personally have a kitchen that looks like Strawberry Shortcake threw up in it, so I have tried to hold back on the strawberry themed kitchen items for my own home. But I sharing the finds with a friend who appreciates vintage kitchen items as I do. Here are a few things that I found on this trip.

SL 14SL 13SL 12

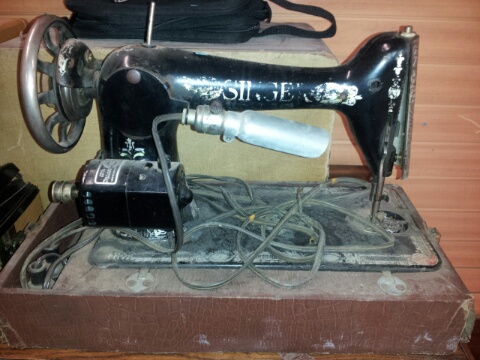
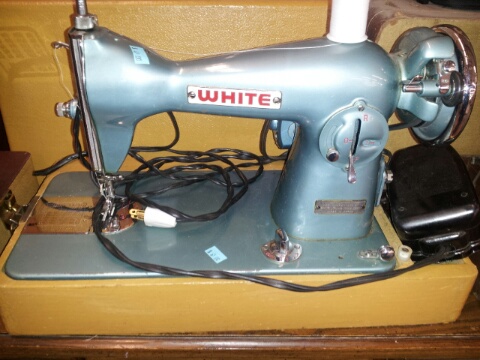
Sometimes the items make me drool. I LOVE, LOVE, LOVE old, vintage sewing machines and cameras. No good cameras this time, but a plethora of BEAUTIFUL sewing machines. Add these to your sewing machine porn collection. Let me wipe the drool off my keyboard as I add the pictures.

SL 8SL 7SL 6SL 5SL 1

There is always a stop in the art and craft section. This is the corner in which I can spend the most time. So much to dig and pick through. They have fabric, yarn, thread, patterns, wooden parts, plastic parts, baskets, undone projects, half done projects, and much more. They also keep blankets and sheets in this section, I never understood why but I have often purchased blankets and sheets to use as fabric for projects and the like.

SL 9

I have also been lucky enough to run into some great furniture for the house. This trip I found a chair that I would LOVE to have in the house, but as of yet, I do not have room. I somehow doubt I ever will. I teeter on the edge of hoarding sometimes.

SL 11

I also found this couch. HOLY MOTHER OF VINYL!!! Yes, it is really bright yellow textured vinyl! You know you want this beauty in your living room to spice things up! 😉

SL 10

And then there is just the random items, such as this incredible drawing and fun hats.

SL 4
SL 3

I feel like I am supporting a good cause when I shop here, as well as browsing through history and the future. Way too much fun!

Posted in Uncategorized | Leave a comment

10% Off Coupon

Here is a coupon for 10% off your next order or $5 or more via our Etsy store http://www.Etsy.com/shop/MuffysWorld Expires 3/31/2014.

Coupon 012014

Posted in Uncategorized | Leave a comment

Radical Retro Crafts!

Being a child of the 80’s I thought this would be a great article to help reminisce! I have been a geek for arts and crafts since I was a kid. My mom always had something fun for us to do. There were three of us kids and we always had friends over so she had to find something for us to do and keep us out too much trouble. I thought that a trip down crafty memory lane would be fun. How many of these have you owned, played with, made, etc.?

One of the first crafts I remembered is craft loops. I actually was able to pick one up at a local thrift shop recently. I, of course, made the obligatory pot holder and use it on a fairly regular basis. I know there are other things to make but I have only ever made pot holders. I have seen bracelets, but what else can you make with craft loops?

CraftLoops1Friendship bracelets! If you grew up in the 80’s you so did not escape this fade! My skills were minimal but I did make a lot of them. I received some as well. And still make them on occasion…..For shits and giggles mostly. How were your friendship bracelet skills?

Friendship Braceltes

Now who doesn’t love the awesome that is the Shrinky Dink? Pure awesome and magic all rolled up in one. Prior to the digital age, customizing items was not as easy. Shrinky Dinks were a really fun way to express yourself. You could color and create whatever you wanted. Or you could color the pre-designed pictures. But we all know that the best part of a Shrinky Dink was watching it shrink in the oven. I still love that!!!

Shrinky Dink 2Shrinkey Dinks

Who remembers spin art? I know I do. I think I even had a t-shirt with spin art and it was all fabulous and glittery. We had a spin art machine….briefly. I always worked to have a beautiful, perfect and colorful creation like this:

Spin Art 1

However, I usually ended up with some blurry, brownish blob like this:

Spin Art 2

I still can’t make a decent spin art. My son received a very cool manual spin art for Christmas a few years back and he pumps out amazing work…..I still in up with brown blobs. LAME!!!

Now I can absolutely bust out some AMAZING spirograph art. And thinking about this, I am going to hop my butt on eBay and buy me a spirograph kit now!!

Spiro Art 1

I remember the need of a steady hand, flat, stable surface and a lot of time. One slip and you would ruin the whole design, no way to erase, and no way to hide it. That was some serious pressure! Just a few examples of the awesome that is spiro art. I also have a thing for pens, so spiro art was great because of all the different colored pens.

Spiro Art 2Spiro Art 3

Macramé may be debatable about the era, but in my house it was an 80’s craft, it went along with the friendship bracelets but on a larger scale because it created larger things. I didn’t get to into this but do remember some really great things that my mom did and that she showed me in some books she had. We dabbled in some very simple patterns and knots.

Macrame Instructions

I do remember sewing some really great plant hangers and always had the intentions of making one…..obviously that is still on the to do list.

Macrame

Another fun project we used to do with yarn was God’s Eyes. These always fascinated me, especially the colorful ones that were very detailed. Although they are a somewhat simple craft to learn, there were so many different things you could do, all depending upon what type and color of yarn you used. You could also mix it up and used something aside from yarn. Such as ribbon, strips of cloth, etc. And the sticks that you used didn’t have to be the standard popsicle sticks. I have seen twigs or branches from trees, longer craft dowels, etc. I remember making them as gifts when I was child for my parents. They never did turn out very nice. But my folks loved them any way.

Gods Eye 1

 While I was researching and looking for more info on God’s Eyes, I found the following design that was INCREDIBLE! I imagine it took a lot of time and patience, but so worth it!!

Gods Eye 2

And now for the grand finale! What post about 80’s arts and crafts would be complete with out a nod to the Bedazzler and all of its sparkly glory?

Bedazzler 1

What household didn’t have one of these? And if you didn’t have one, you had something that had been bedazzled, jackets, pants, shirts, socks, shoes….anything that would hold still got bedazzled at our house, and probably covered in a healthy coating of puff paint as well.

puff paint

How many of you had Bedazzling accidents like this poor young lady?

Bedazzler 3

I think that must be Bjork under all that bling….right?

Anywho, this concludes our trip back to the radical retro craft world of the 1980’s. Was there something you remember making or creating from the 80’s that I did not list??

Posted in Uncategorized | Leave a comment

HOLY MARINARA!!

Although I am no Italian, I love marinara. And I love homemade marinara even better. Sauce from a store bought jar always seems to be too sweet for me. I have put up with it for years, but since I started canning I realized I don’t have to put up with sweet sauce anymore! NO MORE!

 I have worked to perfect my recipe over the last few years and think I finally have it where I want it. I don’t have the recipe written down, and I won’t write it down for this article, but this article WILL give you the basics on how to create, make and perfect your own sauce.

 THE BASICS

Roma Tomatoes…LOTS OF THEM! With this batch, I bought about two, VERY full veggie bags.

 Big Fat Tomatoes….I bought about 4 to use as filler.

A Head of Garlic….you may not use the whole thing, but you just might depending on the size of the head and the amount of tomatoes. You will know why soon.

 Big White Onion…..you can use more if you are an oniony kind of person.

 Basil and Oregano….you can used dry or fresh. I hang and dry my own herbs from my garden. But I use fresh when I have it growing. You can buy both from any market

 Coarse Salt and Pepper….I used Kosher salt usually and I grind my own pepper, because I am stuck up like that.

 Olive Oil….everyone should have olive oil, all the time, for everything. I don’t just use it for cooking either, but that is a whole other story. (Mind out of the gutter!!)

 Baking Sheets….multiple is best, as you will be laying the ‘maters out on them to roast

 Tin Foil….TRUST ME!!! You want to cover the baking sheets or you will be sorry.

 Alright, lets get cooking kiddos!

 Take your Roma’s and slice each one in half. This is where the tin foil comes in. Cover the baking sheets in tin foil or you will be scrubbing burned tomato sugar scuzz off your pans for a very long time! Set the halved tomatoes out in pretty little rows cut side up and fill as many baking sheets as you can. Quarter the big fat tomatoes and the onion(s) and lay those out on the covered baking sheets as well.

 You now want to cut up your garlic, you will want one half clove for each Roma half. Do some math, it’s FUN!!!Image

 Drizzle olive oil over all the Roma halves, the quartered fat ‘maters and the onions, sprinkle generously with salt and pepper, basil and oregano. If you are using fresh herbs you will need to chop them all up nicely, or not nicely, if you are that kind of person. If you are using dried herbs you just need to crush them up in your hands and sprinkle away. I usually use fresh in the summer and dried in the winter, just depends on the growing season. Now you decorate each of the Roma halves with a garlic clove half.

Image

 Heat the oven up to 300-350 degrees and pop all the trays in….and now you wait….a long time. I usually roast them for about 3-4 hours. Mind you, this is not a process where you can pop them in the oven and then leave the house to go to the market. Your oven is on and every oven is different, you need to be there to check on them every half hour or so. I just throw them in and run around cleaning, or you can go the complete opposite and lounge around and watch a few movies. I check on them every half hour or so. Do not turn them or move them at all, they just need to sit there and slow roast to soak up all that roasty, toasty flavor. I shoot for a slow roast of 3-4 hours, but you can go longer or shorter if you choose. It is just a personal choice of flavor.Image

Once you are satisfied with the roast, carefully take the tomatoes, garlic and onions and plop them in a stew pot and mash them with a potato masher or a large wooden spoon and turn the heat to medium until the contents begin to simmer, turn to low and let it simmer for about an hour. (I told you this was a LONG process.) Make sure to stir every 15-20 minutes and mash it up a little. Once this process is done you have a few choices: mash or blend. I choose to throw it all in the blender and whir it up to a smooth, creamy bunch of goodness. However, you are more than welcome to mash them so it is a chucky sauce. It is just a matter of taste and what you enjoy.Image

After I have blended the sauce, or you have mashed the sauce, I put it all back in the stew pot and simmer again for another 20-30 minutes. While it is simmering I get my canning supplies together. Once I am all set up then it all gets canned and labeled, once it is cooled. If you are not going to can the sauce, you can freeze it, store in the fridge or use it right away.Image

And there you have it!

Posted in Uncategorized | Leave a comment

Weekend Breakfast

I promised the little man an awesome breakfast this weekend. Usually that entails eggs, bacon, sausage, potatoes and a hugely messy kitchen. I have been sick all weekend so this was not going to happen. Instead I chose to make crepes. Sweet, delicious, breakfast crepes. I hadn’t made them in years, and the last attempt was a horrible failure, so I was a tad nervous. But I found a great, simple recipe on line here. I had all the ingredients so we were set to go.

  • 1/2 a teaspoon of vegetable oil
  • 2 tablespoons of butter
  • 1 cup of flour
  • 1 teaspoon of sugar
  • 1 1/2 cups of milk
  • 3 eggs

I mixed all the dry ingredients first. Make sure to sift the flour!! Last time I made crepes I didn’t and it was a lumpy mess. Sifting is your friend!! Then add the wet ingredients, careful with the melted butter and the eggs. If the melted butter is too hot and you pour it onto the eggs you will end up cooking the eggs and that kind of ruins it all.

Crepe 10Crepe 11

Get a good large frying pan and treat the bottom with oil. I used olive oil, you could use vegetable oil if you like. Just make sure to brush it around and coat the whole pan.

Crepe 9

Let it season up a bit and then pour in the good stuff!

Crepe 6My oven is uneven so it all runs toward the front of the stove, hopefully yours is a little more even. Treat it like a pancake, when it starts to bubble, flip it. It should look like this when you flip it.

Crepe 5My first crepe is always a sacrifice to the pan seasoning goddesses.

Crepe 7

It is the second crepe that comes out all sorts of yum!

Crepe 8

After the second crepe, we are in business. As they are cooking, I work on gathering our favorite toppings. But remember not to go too far or you will end up with brunt crepes. Do not ask how I know this 😉

Crepe 2

A little melted butter…….

Crepe 4Some fresh strawberries…..

Crepe 3And a beautifully set table, thanks to my little man! (Thank you Mo!!)

Time to dig in and ENJOY!!!!!!!!!!! Bon appetit!

Crepe 1

Posted in Uncategorized | Leave a comment

Make Your Own Herb Butter

With the cooler weather approaching, our garden is starting to wind down. However we sill have TONS of herbs left and I hate to waste them. I have been hanging and drying them to store in sealed jars for clean herbs to cook with all winter long.  I have dried a lot and still have more to deal with. So I decided to make herb butter.

Herb Butter 6

I started with a regular stick of salted butter. Some of the recipes I saw stated unsalted butter but we like salt and I did not want to have to go out and buy more butter just to make this, so salted butter it is. Next I decided to make an Italian herb butter so I got into my stash of Oregano, Basil and Italian Parsley.

Herb Butter 1

I took one stick of butter, 2 tbsp Oregano, 2 tbsp Basil, 2 tbsp Italian Parsley, 1/2 tsp garlic salt and 1/2 tsp pepper and threw it all in a microwavable bowl. I put the bowl with all the ingredients into the microwave (hence the microwavable bowl) and let it go for about 15 -20 seconds. You want the butter to be soft, not melted.
Once this is done you will need to mix the ingredients completely. Once every thing is blended just spoon the butter mixture into ice cube tray or some type of small mold. I used mini cup cake mold.

Herb Butter 4Herb Butter 5

Once you have put it all into the mold, place the mold into the freezer. It should not take more than a half hour for the mixture to become solid. Remove it from the freezer and let it warm up a bit. Then use a butter knife to cut around the edges and pop the butter mold out and place it on to a square of tin foil.

Herb Butter 2Then wrap the butter pat up like a little present, pop it in a plastic zip sandwich bag. Once all pats are wrapped and tossed in the bag, toss the bag in the freezer and WA LA!! You have Italian Herb Butter. You can use this on french bread, steak, as a base for a saute or for just a little flavor in your dish. It’s good stuff and a great way to use your herbs so they do not go bad as the weather cools.

Posted in Uncategorized | Leave a comment

Save Money, Flavor Your Food!

With fall coming, that means harvest time. That also means it is time to store and prep for the colder months. I have a passion for herbs in my cooking. Find out how to save money and keep your herbs fresh and preservative free.

So I have a rather large herb garden just for that, but because of our colder climate I am not able to grow out doors through the winter and a lack of natural light in our house really limits our indoor growing. So what do we do? We could go with out for the winter, buy dried and process crap from the stores or spend even more money on supposedly fresh and very expensive herbs at the store…OR!!! Dry our own!!! It is another super simple and money saving thing you can do to cook fresh and save money.

Herb Butter 1

Oregano is one of the best growers in my garden, it literally can not be killed. I thought it died over the winter but it took over as soon as the ground thawed and spring arrived. I also grow lemon balm,and lemon thyme, which both come back every year as well. This year I planted dill, basil (both sweet and purple), cilantro, tarragon, and parsley. Be careful with parsley!!! It grows and grows and grows and will not stop!!! Plant it alone of it will grow over everything. The oregano and lemon balm will as well.

Herb Butter 6

To dry the herbs you just cut bunches close to the ground, about enough to hold in one hand. I then use twine or yarn to tie the bottoms leaving about a foot and a half at the end. I tie a loop in that, then hook that loop around a hanger and hang that in my hall way closet for about a week, possibly two, depending on the herb. Once it is completely dry I make a huge mess in the kitchen removing the leaves and I store them in mason jars in my spice cabinet. I label with the name and date and it is there to use when ever I need. Most dried herbs will last 6 months to a year, which is more than enough time to take us through the fall and winter.

A simple what to test and see if the herbs are still “good”, meaning will they still add flavor to your dishes, is to take a small amount and crush them in the palm of your hand. If they still have a good smell, then you are good to go. If there is little to no smell then they have lost their potency and you can toss them. They won’t hurt you if you use them, they just will not be as aromatic and flavorful.

The best way to keep them as potent and fresh as possible is to keep them in air tight containers, such as mason jars with the rubber sealed lids, and in a dark area, like a cupboard or root cellar. You want to make sure that the herbs are completely dry before you seal them in the jars otherwise they could mold and THAT WILL HURT YOU!!!. Once they are completely dried and stored then you seal them in the jars and they are set to store and use.

To show the cost savings of drying your own herbs I have compiled a little bit of a list of some more of the popular herbs.

Dried basil at the store costs about $5 for 4 ounces. I can dry 8 ounces myself for about $2!

Dried Oregano at the store costs about $2.50 for 1-2 ounces. I can dry 8 ounces myself for the same price!

Dried Lemon Balm (great for tea!!) 2 ounces for $10. I can dry 8 ounces for $3! I know that not many people use lemon balm but I do and I LOVE it. I love a little lemon balm and ginger steeped in hot water for tea.

These are just a few examples of how much you can save when you dry your own. You can also guarantee that there will be no pesticides or preservatives used to grow or keep them and to me that is important and so worth the effort of growing!

Posted in Uncategorized | Leave a comment

Simple and Easy Vegetable and Fruit Preserving

We often buy more veggies than we can use, mainly because I have grand ideas on making always healthy meals and sometimes there are great deals. However, when reality sets in we have sports practice, late nights, and those always healthy meals turn into something quick that I make on the fly and often those veggies go to waste 😦 I have finally found a way to help keep some of those veggies from going bad and lasting longer. Read on to find out how!

Freezing….that’s the secret. It is easy and simple to do. I does not require a lot of expensive equipment like canning. All you need is a large pot, a large bowl, a colander and some freezer bags. That’s it. Super simple. Super easy. So here are some basics when you want to start freezing veggies.

Properly prepared fruits and vegetables can last up to eight to twelve months in the freezer. This greatly extends the use of your veggies. As opposed to a week or two when not frozen. If you do want to use the veggies with out freezing, a good tip is to rinse your fruits and veggies in a mix of 3 parts water one part vinegar (apple cider or white). This removes pesticides, bugs, dirt, etc. and helps protect the fruit or vegetables.

The first step is to clean your vegetables. I choose to do a quick rinse with cold water and then cut them into desired sizes. Once I have done that I do rinse in the above mentioned vinegar water rinse. You can spray it, pour it or soak it. I chose to soak and swish. I fill a large bowl with 3 parts water, one part vinegar and swish the veggies around. You will actually see a lo of the crud floating in the water. I let them sit in the water for about 5 minutes then I rinse with cold water and set in a colander or on a clean towel to dry a bit.

Once you have cleaned them, it is time to move on to blanching. This is an important step and one that needs to be done right. Blanching helps to stop enzyme actions that cause color, texture and flavor lose. Enzyme action is the natural breakdown process for fruits and veggies. Blanching helps slow or sometimes stop this process so they last longer. It is important to not under blanch, as this will active the enzyme action, and if you over blanch, that will bleach the veggies of color, nutrients, etc. Below is a list of specific times for specific veggies. It is important to start timing the moment the veggies hit the water. Once you have blanched for the proper amount of time it is important that you immediately remove the veggies from the boiling water and immerse them straight into a bowl of water and ice for the same amount of time that you blanched them. Continue to add ice as the hot veggies with melt what is in there.

Blanching Times*

Vegetable

Blanching Time
(minutes)

Artichoke-Globe
(Hearts)


7

Artichoke-Jerusalem

3-5

Asparagus
Small Stalk
Medium Stalk
Large Stalk


2
3
4

Beans-Snap, Green, or Wax

3

Beans-Lima, Butter, or Pinto
Small
Medium
Large


2
3
4

Beets

cook

Broccoli
(flowerets 11/2 inches across)
Steamed


3
5

Brussel Sprouts
Small Heads
Medium Heads
Large Heads

3
4
5

Cabbage or Chinese Cabbage
(shredded)


1 1/2

Carrots
Small
Diced, Sliced or Lengthwise Strips


5
2

Cauliflower
(flowerets, 1 inch across)


3

Celery

3

Corn
Corn-on-the-cob
Small Ears
Medium Ears
Large Ears
Whole Kernel or Cream Style
(ears blanched before cutting corn from cob)

7
9
11

4

Eggplant

4

Greens
Collards
All Other


3
2

Kohlrabi
Whole
Cubes


3
1

Mushrooms
Whole
(steamed)
Buttons or Quarters
(steamed)
Slices
steamed)


5
3 1/2
3

Okra
Small Pods
Large Pods


3
4

Onions
(
blanch until center is heated)
Rings


3-7
10-15 seconds

Peas-Edible Pod

1 1/2-3

Peas-Field(blackeye)

2

Peas-Green

1 1/2

Peppers-Sweet
Halves
Strips or Rings


3
2

Potatoes-Irish (New)

3-5

Pumpkin

cook

Rutabagas

3

Soybeans-Green

5

Squash-Chayote

2

Squash-Summer

3

Squash-Winter

cook

Sweet Potatoes

cook

Turnips or Parsnips
Cubes


2

*blanching times are for water blanching unless otherwise indicated.

Once the veggies have cooled remove them from the ice water and put them in a colander or on a clean towel to drain and dry. Then you will want to put them into a a freezer bag, remove as much air as possible and then seal. Prior to filling the freezer bags you will want to label with at least the date, possibly even the contents. Then toss them in the freezer and TA DA!

Do not fill the freezer with too much at once as the unfrozen items will raise the temperature in the freezer as it works to freeze the veggies. We like to use smaller bags so that we can pull out just enough for how many we are serving at that meal. Normally it is just two of us. So we have one serving per bag and pull out two bags and we are set. It also gives us the opportunity to serve more if we have company as well.

I found some GREAT tips on this website. Not just for freezing but all sorts of preserving. http://nchfp.uga.edu/how/freeze.html

HAPPY FREEZING!!

Posted in Uncategorized | Leave a comment

Blackberry Cobbler

Here is a great recipe for blackberry cobbler. Really you could use this as a basic cobbler recipe with any type of fruit. We have apples coming up this fall, and crossing our fingers that we will get some raspberries from our bush this year. We have some strawberries coming close to ready as well. YUM!! The recipe was first found via The Pioneer Woman. She is GREAT!!! I don’t much care for her show but I do love her recipes! And this one is SUPER SIMPLE

Ingredients

1 stick of butter

 1 ¼ cup sugar

1 cup self rising flour

1 cup milk

2 cups blackberries, fresh or frozen (can replace with any kind of diced fruit!)

Directions (Serves: 8 Prep: 20 mins Cook: 1 hour)

Melt butter in a microwavable dish. Pour 1 cup of sugar and flour into a mixing bowl, whisking in milk. Mix well. Then, pour in melted butter and whisk it all well together. Butter a baking dish.

Now rinse and pat dry the blackberries. Pour the batter into the buttered baking dish. Sprinkle blackberries over the top of the batter; distributing evenly. Sprinkle ¼ cup sugar over the top.

Bake in the oven at 350 degrees for 1 hour, or until golden and bubbly. If you desire, sprinkle an additional teaspoon of sugar over the cobbler 10 minutes before it’s done.

And DONE!!! Super simple and super YUM! Seriously, you need to do this!!!

Blackberries

Posted in Uncategorized | Leave a comment

Clean and Save! Make Your Own Laundry Detergent

How many of you feel that laundry rules your life? I know I do. Laundry is never ending, washing, folding, hanging, etc. And along with laundry you must have detergent. Depending on your preference, and needs for detergent, this can get expensive. Unfortunately we have some sensitive skin and scent sensitivity, *rolls eyes*,  so we had some expensive laundry soap. I used liquid for a number of years but it was just so expensive and it was not as “concentrated” as they claimed. With a young boy who loves playing outside and living in the forest, we have some tough stuff to wash. I thought that I would just continue on with expensive, chemically filled, processed soaps, for ever…..I was wrong. Enter the addiction of Pinterest!

While searching, for who knows what, one day, I came across a post for homemade laundry detergent. There was a liquid version and a powdered version. I choose the powdered version, as it seemed easier…ya, I am a little lazy sometimes 😉

The original recipe called for the following:

1- 4lb 12oz box Borax

1- 4lb box baking soda

1- 3lb 7oz box washing soda

3 bars Fels-Naptha or 2 bars Zote Soap

2 small containers Oxy Clean

The instructions are fairly simple, grate the soap with a cheese grater. (Don’t worry it washes off in the dishwasher and will be safe for cheese again) then mix everything together in a big bucket, 5 gallon bucket works. I tried this on a very small level so I could test it out with out committing to a huge amount. This recipe worked OK, but it didn’t cut through the dirt like I needed it to. It cleaned things, but the true test is little man’s socks, and it just wasn’t cutting it. So in true ME style, I tweeked it. Here is the recipe I have been using for over a year and have been quite happy with!!

1- 4lb 12oz box Borax

20 Mule Team Borax


1- 4lb box baking soda

baking-soda


2- 3lb 7oz boxes washing soda

washing soda large


1- bar Zote Soap, grated

OLYMPUS DIGITAL CAMERA


1- bar Dr. Bronner’s Castile Soap (pick your favorite fragrance), grated

Dr. Bronner's Castile Soap


1- medium container of Oxy Clean or like generic (Generic works great and is much cheaper)

Oxyclean


1- 5-8lb box of biodegradable, organic powdered laundry detergent. (I used a 5lb box of Country Save)

CountrySaveDetergent


Again the directions are really simple!!! Grate the bars of Zote and Castile soap first. I picked up an old grater from our local thrift store for this and grating of other non-food items, but the soap washes right off the grater in the dishwasher or by hand if you just have the one. The shreds will need to be broken up, simple stir a lot with a spoon or crush them up with your hands. If you do not do this the shreds will not dissolve easily in cold water washes. Once this is finish add all of the ingredients, one by one, stirring each in between adds, to your 5 gallon bucket. I used an old 5 gallon cat litter bucket, recycling at it’s best!! I use about a 1/4 cup of the detergent for the average load and a 1/2 cup for the fun dirty or large loads. Some online recipes say you can use as little as a few tablespoons, but in our house we seem to need a bit more. I made this amount in May of 2012 and we just ran out last weekend!!! 14 months of laundry for about $40….you can’t beat that!

A few tips:

– Stir the contents about twice a month as some of the ingredients will clump together and breaking them up is lame.

– My mother has an High Efficiency (HE) washer and this works fine with her machine.

-We run of a well and do not have any trouble with the powder detergent in hot or cold wash, however, some others I know have reported issues with powder detergent, homemade or store bought. It depends upon your water.

– Most of all, have fun with it, use castile soap in the fragrance you like, or no fragrance at all, they have that!! Feel free to share your experience, tweek the recipe to fit your needs, etc.

Laundry

Posted in Uncategorized | Leave a comment